
SeepingThat constant drip… drip… drip can drive anyone crazy. If you’ve been searching for how to fix leaking shower head, you’re not alone—and the good news is, you usually don’t need a plumber to solve it.
Most leaks come from small, fixable issues like worn washers, loose connections, or mineral buildup. In this guide, you’ll learn exactly what’s causing the problem and how to fix it step by step.
What Causes a Leaking Shower Head?
Before jumping into repairs, it’s worth understanding why your shower head is leaking in the first place.
Common Causes of Shower Head Leaks
- Worn-out rubber washers or O-rings
- Loose shower head connection
- Mineral buildup from hard water
- Faulty shower valve or cartridge
- Damaged pipe threads or seals
Sometimes, the leak continues even when the water is off, which usually points to an internal valve issue.
How to Fix Leaking Shower Head: Step-by-Step Guide
Let’s walk through a practical, beginner-friendly process you can follow at home.
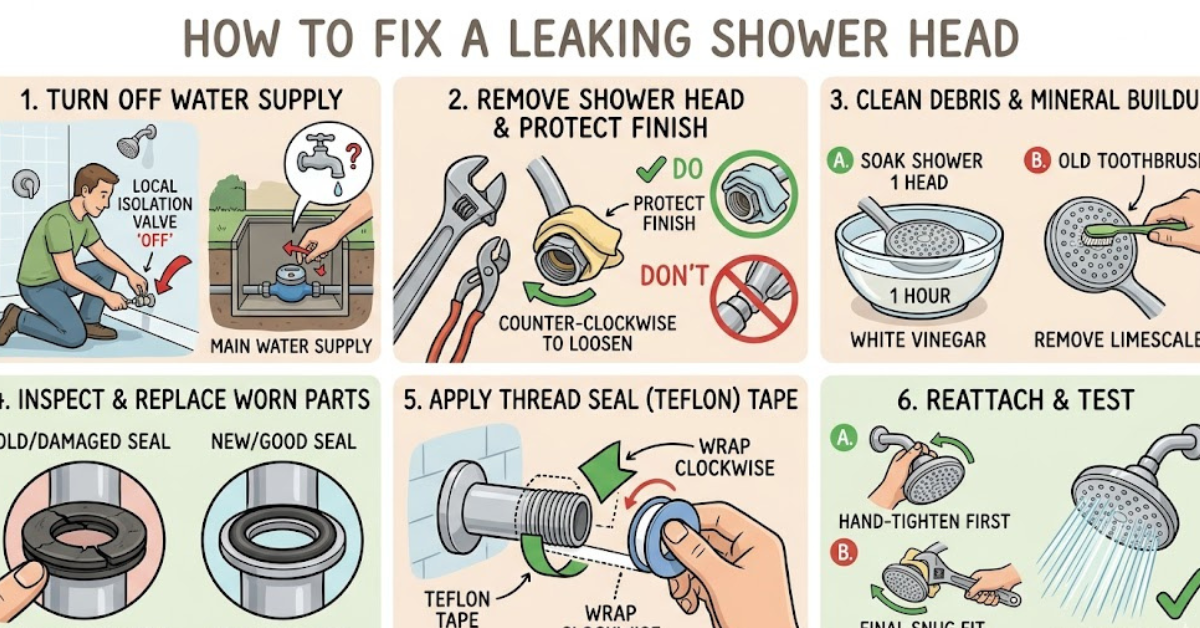
Step 1: Turn Off the Water Supply
Start by shutting off the water to avoid any mess.
- Use the main water valve if needed
- Turn on the shower briefly to release pressure
This ensures a safe and clean repair process.
Step 2: Remove the Shower Head
Unscrew the shower head carefully.
- Use a wrench or pliers if it’s tight
- Wrap a cloth around it to avoid scratches
Once removed, inspect the inside for visible damage or buildup.
Step 3: Clean Mineral Deposits
Hard water can clog and damage components over time.
- Soak the shower head in vinegar for 30–60 minutes
- Scrub gently with a brush
- Rinse thoroughly
This step alone can fix minor leaks and improve water flow.
Step 4: Replace the Washer or O-Ring
A worn washer is one of the most common causes of leaks.
- Remove the old washer inside the connection
- Replace it with a new one of the same size
- Ensure it sits properly
This is especially important when dealing with a leaking connection or pipe joint.
Step 5: Apply Plumber’s Tape
Thread seal tape helps create a tight, leak-proof seal.
- Wrap tape clockwise around the pipe threads
- Use 2–3 layers for best results
- Reattach the shower head securely
This step is crucial when fixing leaks at the pipe or connection point.
Step 6: Reassemble and Test
Once everything is back in place:
- Turn the water supply on
- Check for leaks
- Tighten slightly if needed
If the dripping stops, you’re all set.
How to Fix Leaking Shower Head When Water Is Off
If your shower head drips even when the water is off, the issue is deeper.
Possible Causes
- Faulty shower valve
- Worn cartridge inside the faucet
- Internal pressure imbalance
What You Can Do
- Replace the shower cartridge
- Inspect the valve for wear
- Consider professional help if unsure
This type of leak isn’t about the head itself—it’s about the system behind it.
Fixing Different Types of Shower Head Leaks
Not all leaks are the same. Here’s how to handle specific cases.
Leaking Shower Head Connection
- Tighten the connection
- Replace the washer
- Use plumber’s tape
Leaking Shower Head Pipe
- Check for damaged threads
- Apply fresh seal tape
- Replace the pipe if worn
Seeping Shower Head Hose
Common in handheld showers.
- Inspect hose for cracks
- Replace rubber seals
- Swap out the hose if damaged
Tools You’ll Need
You don’t need a full toolbox—just a few basics.
- Adjustable wrench
- Plumber’s tape
- Replacement washers or O-rings
- Vinegar for cleaning
- Cloth or rag
These simple tools can handle most repairs.
Common Mistakes to Avoid
Even simple fixes can go wrong if you’re not careful.
- Over-tightening and damaging threads
- Skipping the washer replacement
- Using the wrong size parts
- Ignoring internal valve issues
Taking a careful, step-by-step approach prevents repeat problems.
How to Prevent Shower Head Leaks
Once you’ve fixed the issue, keep it from coming back.
Prevention Tips
- Clean your shower head regularly
- Check connections every few months
- Use a water softener if you have hard water
- Replace worn parts early
A little maintenance goes a long way.
FAQs
Why is my shower head leaking after I turn it off?
This usually indicates a faulty valve or cartridge rather than an issue with the shower head itself.
Can I fix a leaking shower head myself?
Yes, most leaks are easy DIY fixes involving washers, cleaning, or tightening connections.
How do I fix a leaking shower head connection?
Remove the head, replace the washer, apply plumber’s tape, and reattach securely.
What if cleaning doesn’t stop the leak?
You may need to replace internal parts like the cartridge or check the plumbing system.
Is a leaking shower head expensive to fix?
Not at all. Most fixes cost very little and require basic tools.
Conclusion
Learning how to fix leaking shower head problems can save you time, money, and a lot of frustration. Whether it’s a loose connection, a worn washer, or mineral buildup, most issues are quick and easy to handle at home.
Start with simple fixes like cleaning and tightening, then move to deeper solutions if needed. With the right approach, you can stop the drip for good and enjoy a quiet, efficient shower again.